Day 217 – How to cover that Journal!

Finishedsketchbook

strathmore1

I started with a plain Strathmore soft back mixed media Journal.  I decided that if I was NOT sketching at home I had better add hard covers to it…and besides its not the prettiest book on the shelf!

Supplies

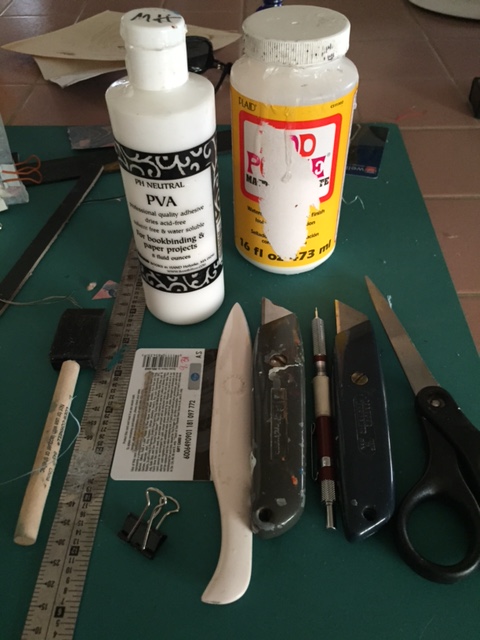
Supplies I used…be sure your box cutter has  a sharp blade.  Makes life easier as does a metal ruler…cant cut it with the box cutter.

Supply list!

Archival paper for cover

Archival Cardboard

Green self healing mat

Parchment paper, freezer paper, waxed paper or deli wraps

PVA glue and or Modge Podge

Foam Brush

Pencil

Scissors

Metal Ruler

Sharp Box Cutter

Bone folder

Old credit card to smooth bubbles from paper

Binders clips or clothes pins to clamp edges

First I cut two heavy cardboard covers from the back of an old art tablet.  Good to use archival NON acid paper so the wood pulp wont be able to eat up your sketches!

 Trim all paper and cardboard with the box cutter and metal ruler to keep those edges straight!

I have a great box of marbled and other fancy papers from Paper Mojo...lots of beautiful scrap.  Because its scrap none of the pieces are big enough to cover a journal entirely so I piece the covers out of coordinating papers.

Lets get started!!

first cardboard covered

Cut the paper used to cover the cardboard about 1/2″ larger than the cardboard cover. Use the bone folder to make nice folded edges.

topviewedgesfolded

Heres the front side of the cardboard with edges folded over. The paper is glued on! Smooth any bubbles out with either an old credit card or the bone floder.

The covers were glued onto the journal with the PVA glue.

 miteredcorners

Once the covers were glued on its time to flip over the folded edges. miteredcorners1

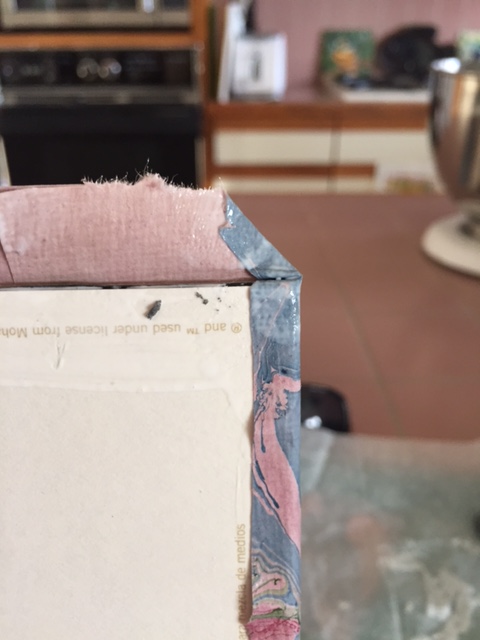
Miter the corners just like wrapping a gift.  CLIP diagonally across each corner to eliminate bulk.  Then neatly fold in your corners.  This will be covered with a piece of paper for the endpapers so the uneven paper does not show when you open the book.

clampedcoverdrying

I use binders clips with deli wraps inside to let the folded edges dry.  You could also use parchment paper or freezer paper to do this step.  Clothes pins instead of binders clips.

coverclampedtodry

Time to cut the spine.

cuttingspine

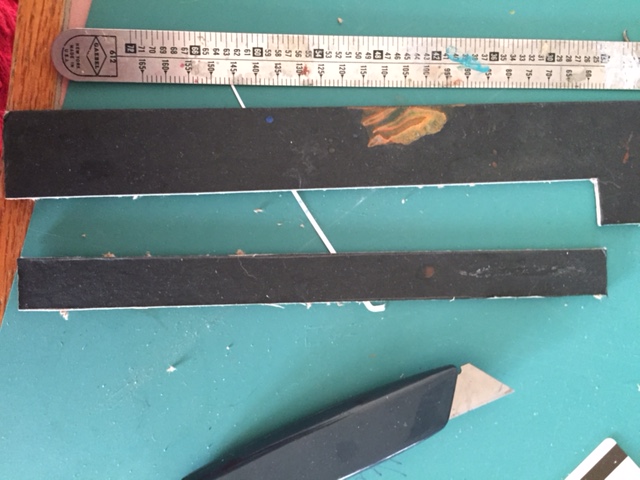
Time to cut a piece for the spine.  The spine should be the width of the book including the covers and the length of the book. Clear as mud right?? The width of the spine to include the covers. spinecovercentered

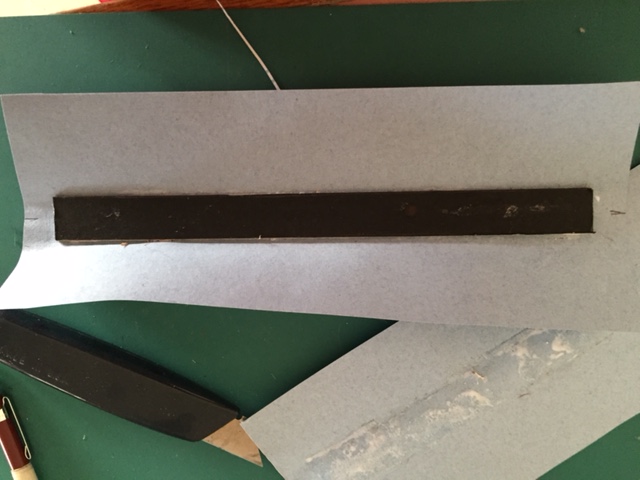
Here is a picture of the paper covering the spine.  I put two hashmarks top and bottom on the center of the paper that is to cover the spine.

spinepaperbck

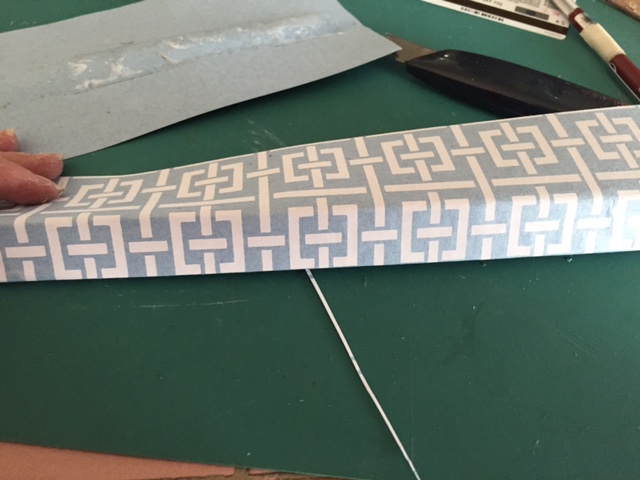
To make covering the spine even more of a challenge I had to center this boxy looking lattice on the spine. I folded it along each side of the spine using the bone folder to crease the paper. I then checked before I glued it down to be sure it was centered.

spineclipped

At the top and bottom of the spine cut a 45 degree angle and fold the paper on the spine down to cover the cardboard spine.  Spines normally float free and should not be glued but my paper was thin so I decided to glue it down.

foldspineover

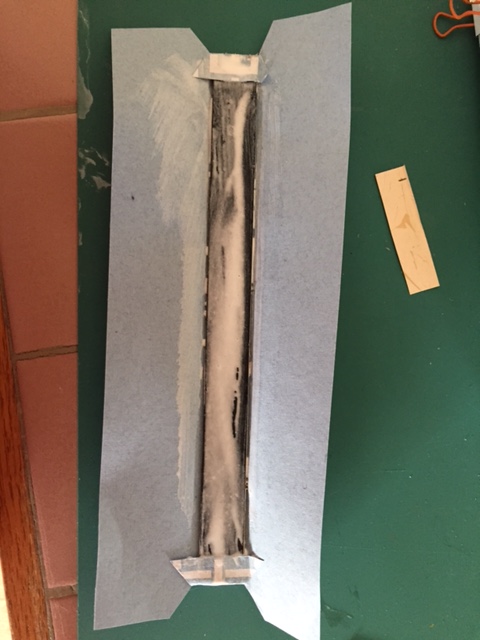
Glue the spine to the book and fold over the remaining edges. I didnt need to clamp it with the binders clips because the glue is so sticky it held. If it hadnt I would have held it in place with the clips till it dried.

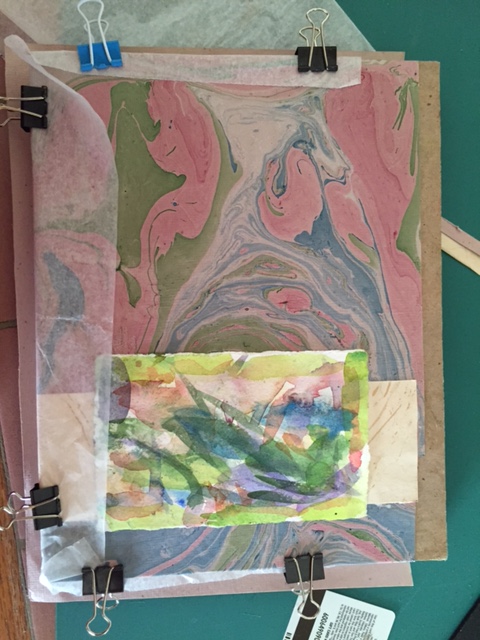
Cut two pieces of archival paper to cover the insides so all your folded paper doesnt show. These are called the endpapers.  Glue them down with the PVA glue.

Clamp with the binders clips and protect the book with deliwrap.

 Let dry.

Finishedsketchbook

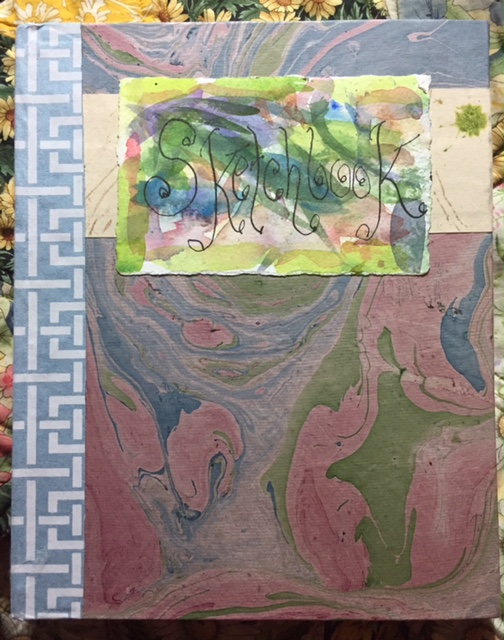
Glue a scrap of watercolor paper painted with pretty colors for your title!

Coat the book with Modge Podge to make it more durable.

Now go forth and draw!!

Thanks for looking!!

Day 217 – Life Modeling in Aiken

Amy

With the lovely Amy.  My best one so far I think….love the way it turned out.  I did the sketch completely from start to end with Caran d’Arches Neocolor II watersoluble wax pastels.

TIP: I sprayed them with a fine misty spray bottle to get the colors to brighten.  It was so  much easier than brushing the colors with a brush that I was finished early….this is a big picture…on a watercolor half sheet.  If you do this why its vertical you get some lovely drips of color.

TIP: I also used an old grumbacher hog bristle brush to life color off the page.  That worked great like across the top of the thigh where I did not have enough curve and the light on the front of the left leg.

TIP: You can also wipe out color at least on Fabriano with a folded paper towel.  Fabriano is terrific for letting you lift color when its wet.  Tough paper!!

Try it you will see how much easier it is…I think this would work with watercolor pencils too.  I hate to think of the number of times I have spent hours coloring a picture with watercolor pencils only to loose some lovely detail when you wet them with a brush.

The texture of the sketching can also just disappear before your eyes when you use a brush…Going to try that technique again…alot of fun. Paper is Fabriano Artistico 140# watercolor paper.

Now will an animal or a person PLEASE hold still long enough for me to sketch them??

Day 216 – So many days!!!

Amazing that I am at 216 days of consecutive blogging. Onward. Hoping for 365 days!!

IMG_8026Last night I discovered one of Roz’s assignments was draw your pets everyday. Oopps!!

I did four last nite. I thought three were done. This is Zoe peering at me around her favorite feather pillows hoping I was done messing and could now pay attention to her. Done with Caran d’Arches Neocolor II on Strathmore 500 paper. They loved each other.

IMG_8024

Here’s another one of Zoe done w watercolor on Strathmore 500. I used the water brush. Lots of blotchy washes. Not a good look!! I really think it was the watercolor brush. Hard to get a big wash going with drips of water.

After looking at this photo decided it wasn’t done. No background and some more color on that green and brown and blue pillow. Or maybe it just looks not done when you compare it to the first one?!

IMG_8025

Tom insisted on sitting on my lap most of last night. Have you ever tried to draw and paint with a determined cat on your lap?! Groan!

The good news. He sat still so long I managed to draw him.

Done with Caran d’Arches Neocolor II on Strathmore 500 paper.

Day 215 – Those Darn Dino’s.

These are my pseudoscientific drawings. My grandson is going to love these.

More Dino’s. As usual I had to write all over the page.

IMG_7984
I picked out a few odd dinosaurs I have never heard of and as a former teacher and mother of three sons I have read about ALOT of dinosaurs. This one started out as rust and beige. He faded into the background. My caran d’arche neocolor II were sitting next to me so I started coloring. Like him much better a weird green blue and burgundy red. All the little circles were drawn with my Noodler Creaper Ahab. I embellished him with my Pentel Brush pen. Played with my waterbrush. Just had fun!! Wrote his name with my big black pit marker. .

IMG_7986

I had to buy the Nanking Lizard with his huge claws and that weird long name. When drawing the geese today all I could think of was how much they reminded me of this Dino.

IMG_7988He also got a redo on the color so he would pop off the background. Rust and gold was not getting it. This time with piemonite and cobalt blue.

IMG_7985

I just had fun with the T Rex. Wrote his name with my big black pit marker. Otherwise I used the same black pens. The greens are Tombow pens. White teeth the big Pitt pen. Where have you been all my life?!

Thinking about drawing a book of Dino’s for Henry for his birthday or Christmas. That would be fun for both of us!

Thanks for looking!!!

Day 214 Hoping for better LucK

Hopefully this post will not disappear before I publish it like yesterday’s did!!

IMG_7892.

My sweet Jack Russell Zoe snoozing on the back of the sofa. She was annoyed because she wanted to be in my lap and I was drawing.

This picture is done completely with markers- blue, green, red and grey Tombow markers, a Staedlee pen and a Pitt white marker. That’s it. Nothing else.

I used a water brush to give the effect of watercolor, mixing color on the paper. The white marker was used to brighten some of the white lights. I am so good at loosing those!! The paper is Strathmore 500 mixed media.

Did you find Zoe’s second ear?! It’s there!!

Thanks for looking.

Day 214 Hoping for better LucK

Hopefully this post will not disappear before I publish it like yesterday’s did!!

IMG_7892

My sweet Jack Russell Zoe snoozing on the back of the sofa. She was annoyed because she wanted to be in my lap and I was drawing.

This picture is done completely with markers- blue, green, red and grey Tombow markers, a Staedlee pen and a Pitt white marker. That’s it. Nothing else.

I used a water brush to give the effect of watercolor, mixing color on the paper. The white marker was used to brighten some of the white lights. I am so good at loosing those!! The paper is Strathmore 500 mixed media.

Did you find Zoe’s second ear?! It’s there!!

Thanks for looking.

Day 213 – WOW I don’t like that number!!

I started my post with some trepidation over the number 13.  I am Irish enough I see a cloud over that number.  I was right.  I had my post all done and accidently closed it…vanished gone…nowhere to be found. SIGH!! That would never happen with blogger.  It saves as you type…oh well we live and we learn right?!!

Time to post some more sketchbookskool homework.  The assignment was to draw some plastic animals in preparation for drawing live animals.  I did it backwards but at least I did it right??  I have lots of animals at my house…but no plastic ones.

I went to Krogers and bought some from their $1 bin.  They stunk. I bought them anyway.  More about the stinky animals from Krogers but suffice to say you can buy them at some Michaels and also at Dollar stores. They dont stink and the Michaels ones have great detail.

I had several pages already painted in my Strathmore 500 Mixed Media sketchbook that were for Dr. Sketchys 2 and 5 minute gesture sketches.  We didnt have any gesture sketches last Wednesday so I decided to draw the animals on those pages.

Tyrannosaurus Rex

Tyrannosaurus Rex

This is my Michaels T-Rex.  I MISSPELLED his name. Seriously. SO I decided to write all over the page. Not happy with the first large drawing I drew him again….also from the front.I looked up T Rex in wikipedia and wrote down facts about him making this a scientific page.

Giraffes

Then I drew the Raffe…hes my favorite…hard not to love them. My toy giraffe is about 8 inches tall!! I drew him from various views like I was going to do with our Dr. Sketchys model.  Rather like the effect.  Then I wrote Giraffe all over the place.  I can’t seem to stop writing on my sketches lately.

Pens used!  Pentel Brush Pen, Lamy Vista Fine and a Stadler.  Also my Noodler Creaper Ahab.  I did add some color to the giraffe.  Burnt sienna and touches of Burnt Umber in the spots.  Shadows were done with Cobalt and Piemonite.

Thanks for looking…lets pray this one posts!!

Day 212 – a few leftovers?!

IMG_7853

I almost have more than I ever post. This is Sketchbookskool homework leftover from last week- Friday. While I was watching Roz’s SBS video where she drew the love bird my cat was looking for that darned bird. He sat on that rug listening and patiently waiting for that bird. So I played it again and I drew him. Often he moved as soon as I started. Sometimes not. Some are complete some aren’t.

IMG_7852

Then he moved to the backdoor. He knew there were birds outside that door. That also involved considerable yowling on his part. I made up a story about him as I drew him wishfully thinking about eating and being let out.

IMG_7854

Next I noticed my Jack Russell Zoe watching Tom carrying on from a sunny spot in the window. Zoe loves to sleep in the winter sun that streams into the den.

Wish I hadn’t painted the background yellow but oh well.

IMG_7850
A quick tiny sketch of Roz that I did while watching the supply video. Has a Rozish quality I think. Painted with Daniel Smith paint which I know she would approve of.

Day 211- a New Beginning or Trials and Tribulations!!

Sometimes you just have to start over. IMG_7809
A new sheet of paper a new sketch. I went with the plumbline approach.  Trying to be sure that eveything was in line!  I started drawing her by trying to matching up the angle of the neck.  Then I drew an oval for her head and her shoulder line.I also tried to check the negative space that her chin, neck, and shoulder form.

IMG_7810
Making progress.  A little Jawy still.  Colors used DS Quinacridone Coral with a touch of cad yellow light for skin.  Cerulean and burnt umber plus piemonite and cobalt for shadows.  Hair is quinacridone sienna for highlights and ultramarine blue mixed with burnt umber for darks.

IMG_7815
Calling her done at least for the moment. I think she’s much improved. Especially her hair! Background piemonite and cobalt.

Thanks for looking!!