Day 232 Sunday Experiments

A grey rainy Sunday makes for a good day to draw the birds at the feeder. Two double page spreads and two single pages later I think I am done. One page of Zoe too.

I was trying to get the hang of drawing with the Pentel brush pen making those fine lines Roz Stendahl gets with hers. Not easy. I drew two pages in the Strathmore 500 Mixed Media journal then changed to the Stillman and Birn Zeta hoping it’s smooth paper would make drawing with the pen easier.

I even changed to a Kuretake brush pen by the page labeled p. 3 to see if it made it  easier to draw fine lines. Kuretake pens, another Japanese pen, seemed to dry much quicker than my beloved Pentel brush pen which never fails to run when I hit it with water when I paint. The Kuretake did NOT run even if I got water on it right after drawing with it…VERY quick drying.

FYI I bought my Kuretakes at Binders in Atlanta -the only Atlanta art store I have ever seen them in. The Pentel Brish Pen which is supposed to be permant is at all three Atlanta art stores but cheapest at Sam Flaxs in Midtown.

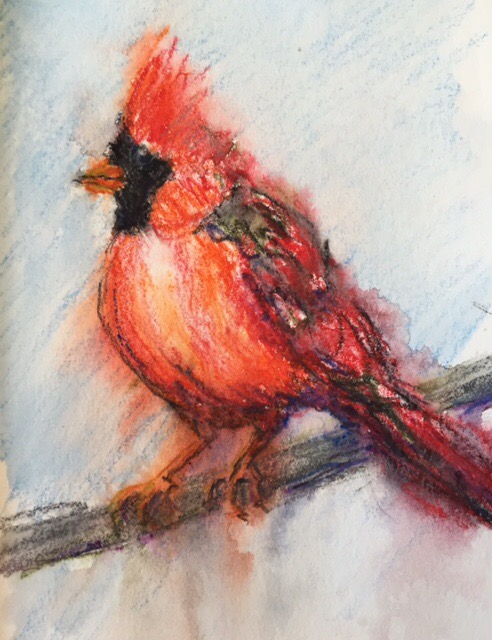
Not being able to leave the drawings alone I colored all the pages in the Stillman and Birn Zeta but not the Strathmore 500 Mixed Media journal. All the pages were colored with Caran D’Ache watersoluble crayons which are such fun.  Drawings were done with ink only…no pencil used.

IMG_8463

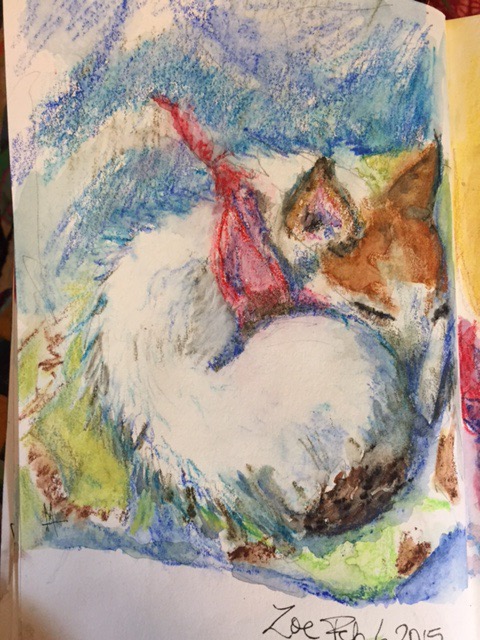
These are the birds done with the Pentel pen on Strathmore 500. It did seem to do a great job on the sketches of Zoe down in the right corner.

IMG_8462

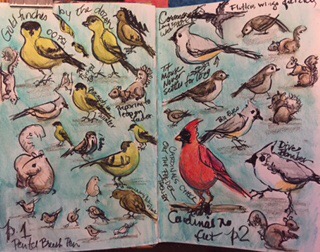
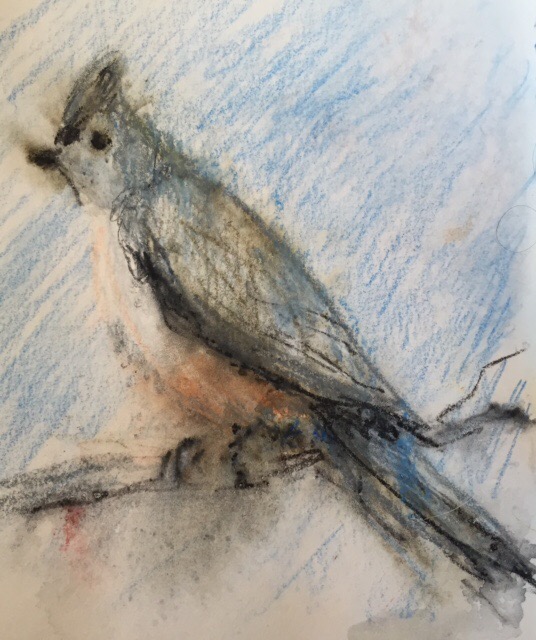
First page in the Stillman and Birn Zeta still with Pentel brush pen.

IMG_8458

Some of this was done with the Kuretake pen. The chickadee with the smear is the Pentel brush pen …even an hour later it was still NOT dry.

The doves stuck around for quite a while today. Like the gobbling finches and squirrels I am sure they were hungry. I have been going thru the bird seed this week – 10 lb so far.

IMG_8465

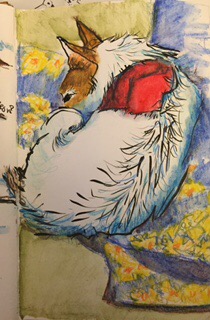
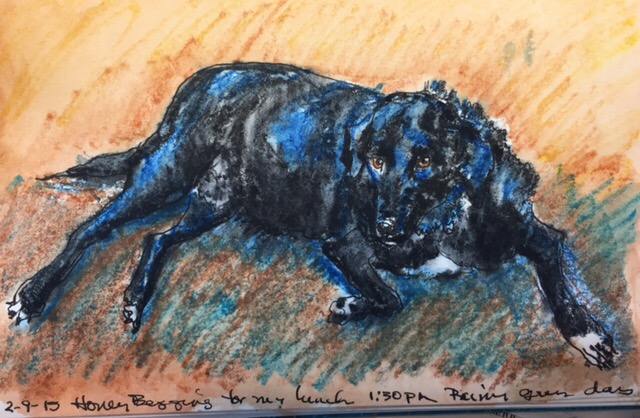
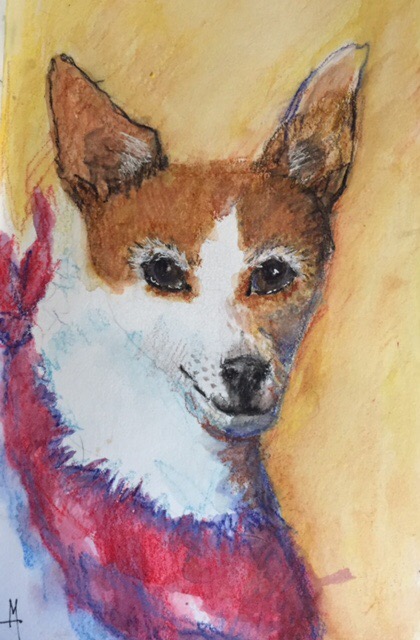
Drawing Zoe was so much fun with the brush pens that I decided to draw a bigger pic of her. I used both pens on her fur. I think it was easier to make the fine lines with the Kuretake. Whichever you use it really takes a very light touch to get a fine line. I DONT have a light touch whether it’s pen or pencil.  MORE practice required!!

IMG_8466

Not as full as the other pages. I needed a nap after I did this one. It was beginning to pour and only the bravest animals were at the feeders by then.

Did the pen make a difference??  THe Kuretake was definitely faster drying and much more waterproof than the Pentel.  I hate to tell you how many times I have had the Pentel bleed HOURS after I drew with it.  Try the Kuretake pen, a disposable pen, if your Pentel brushes are giving you trouble. Maybe the bristles are a little stiffer?! As one of my first graders Dresean once told me That’s all I got Miz Hunt!!

Did the papers make a difference??  I really couldn’t tell that it was easier to draw with the brush markers on the S&B or the Strathmore 500. Maybe I need that Japanese journal Roz raves about on Roz all wound up?! HMMMM.

Thanks for looking!

Day 229 – A Few Bits and Bobs

Terribly cold here today and I cant stay home. Ten degrees with the wind chill this morning and it will be that bad tonite. Somebody send some warm air back.

Because I am busy today will post some more that I haven’t posted yet

.barnesandnoble

I drew this at the Starbucks at the local Barnes and Noble a few weeks ago.  I really need to go again.  You really begin to know alot about the people you sketch if you sit there and collect drawings like I did on this one.  The young girl was on her cell phone though I thought she looked a little suicidal with her hair in her face all dressed in black. I was relieved when I noticed she was on her cell phone.

The old guy was talking animatedly about taxes.  Groan…dont want to hear about taxes!!

hamptoninn

A very fast sketch that I drew while Jan checked out at the Hampton Inn in Valdosta.  I really like its chunkiness…almost an abstract. Always a favorite of mine it was NOT well received on Instagram but I still like it anyway!  This was sketched as I sat in the middle of a room of people eating breakfast busily walking by me checking out and getting coffee.  No one seemed to notice what I was up too…there are two more pages!!

Florida

This should have been in my Key West sketchbook. It started as a double page spread but I never finished the other page so it never got finished.  I dont know if you have ever driven from Atlanta to Key West but its a VERY long LONG trip!! I guess I will finish the other page when we go back this summer!!!

Starbucksatl

This well dressed older man was sketched at the Atlanta Starbucks in Edgewood Barnes and Noble.He had such long fingers.  I also have his hadn drawn somewhere else…Hands can give you fits and do require PRACTICE!!

Thanks for looking!!

Day 228 – A Bit of Fun

Squirrels are the bane of bird feeders. Pesky things. Ours are so bold. They leap and attack it or they climb upside down on the chain to gorge at the suspended feeder. They even use the screens on the nearby porch as a get away.

IMG_8358

One of them was posing on the deck outside the window. I caught him actually behaving. Later on when one of them was hanging off the feeder upside down I decided to turn it into a Wanted poster after all they are thieves aren’t they?! So naughty.

He was drawn with Tombow Markers. I have four or five of them and used the range of greys to shade and sculpt him. Then I wet him down to let the colors mix on the Strathmore 500 mixed Media Paper. I don’t know why I use the Tombows because according to Roz Stendahl they are not archival. The colors are fugitive. So sad because they are such fun to use and give such a neat effects when wet.

Since I don’t have a brown Tombow I used caran d’ache watercolor crayons for the browns and yellows.

I also used a big white Pitt matker to make him look more fluffy especially on his tail. Love that pen!!!

I used a scrap of old yellow ledger paper because I didn’t like the original layout. If you can’t fix it glue over it and try again. And then it becomes mixed media, right?!

Stay warm. Thanks for looking.

Day 226 – a few more bits and pieces

IMG_8304

A group at Panera. I actually knew one of the women but she never noticed me sitting in the booth drawing her. Funny I think.

IMG_8309

A close up of the Panera group.

IMG_8294

My hand model. Hands are hard to draw so it’s great to have a hand model. Also known as my right hand.
Done with my Pentel brush pen.

Day 220 -A nice round number

To have reached. Been a busy day. Sketching people at the Bean. Lunch at Raes Coastal Cafe which looks like a great place to sketch and Browns Feed and Seed with Chickens. Been looking for chickens to sketch.

A commission. ExCitEmEnT!!

Last nite one of the best watercolor sketches I have done. Life is good!!

IMG_8129-0

The teapot was made by local potter Shishir At Tirecity.com. I coveted his teapots for a long time before I got one.
I will try to describe how I painted this. I washed the pot w a pale mix of cerulean and burnt sienna. Shadows were done with more cerulean. The hard part was the blue lines. And making the pot look rusty.

I actually painted with two paint brushes. One to paint the dark blue line and a watery smaller brush to paint the edges so it bled. The same thing with the rust. Spots of rust aka burnt Sienna were dotted around and I smudged them. I think it would have been easier to splatter this but I was afraid to get my background dirty with splatters.

Then I discovered I was suppose to use a water soluble pen. OPPS. I at least drew the block around it.

IMG_8110

I did a contour drawing of it first with my noodler creaper Ahab.

IMG_8109
This is what it looked like without the pen square. Which one is your favorite?!

Thanks for looking!!

Day 219 More Caran d’Arches Experiments

IMG_8098

This is a sketch using Caran d’Arches Neocolor II looks
pretty lame until you wet the colors.

IMG_8100

Then it looks like this. All of these sketches were done with the Caran d’Arches and then sprayed. The bottle I use does a very fine mist. The paper is Strathmore 500 Mixed media.

IMG_8097

Zoe
I love the way it will run a bit. Sometimes less sometimes more depending on how much I spray it.

IMG_8101

Zoe

IMG_8102

Tufted Titmouse – the grey stuff below the bird is not where I messed up but where it ran. I love runny stuff.

IMG_8099

Cardinal. Love the drippy stuff on this one. I did highlight the eyes with a gel pen.

IMG_8103

My secret weapon. An old spray bottle that makes a fine mist!!

Thanks for looking!!

Day 217 – How to cover that Journal!

Finishedsketchbook

strathmore1

I started with a plain Strathmore soft back mixed media Journal.  I decided that if I was NOT sketching at home I had better add hard covers to it…and besides its not the prettiest book on the shelf!

Supplies

Supplies I used…be sure your box cutter has  a sharp blade.  Makes life easier as does a metal ruler…cant cut it with the box cutter.

Supply list!

Archival paper for cover

Archival Cardboard

Green self healing mat

Parchment paper, freezer paper, waxed paper or deli wraps

PVA glue and or Modge Podge

Foam Brush

Pencil

Scissors

Metal Ruler

Sharp Box Cutter

Bone folder

Old credit card to smooth bubbles from paper

Binders clips or clothes pins to clamp edges

First I cut two heavy cardboard covers from the back of an old art tablet.  Good to use archival NON acid paper so the wood pulp wont be able to eat up your sketches!

 Trim all paper and cardboard with the box cutter and metal ruler to keep those edges straight!

I have a great box of marbled and other fancy papers from Paper Mojo...lots of beautiful scrap.  Because its scrap none of the pieces are big enough to cover a journal entirely so I piece the covers out of coordinating papers.

Lets get started!!

first cardboard covered

Cut the paper used to cover the cardboard about 1/2″ larger than the cardboard cover. Use the bone folder to make nice folded edges.

topviewedgesfolded

Heres the front side of the cardboard with edges folded over. The paper is glued on! Smooth any bubbles out with either an old credit card or the bone floder.

The covers were glued onto the journal with the PVA glue.

 miteredcorners

Once the covers were glued on its time to flip over the folded edges. miteredcorners1

Miter the corners just like wrapping a gift.  CLIP diagonally across each corner to eliminate bulk.  Then neatly fold in your corners.  This will be covered with a piece of paper for the endpapers so the uneven paper does not show when you open the book.

clampedcoverdrying

I use binders clips with deli wraps inside to let the folded edges dry.  You could also use parchment paper or freezer paper to do this step.  Clothes pins instead of binders clips.

coverclampedtodry

Time to cut the spine.

cuttingspine

Time to cut a piece for the spine.  The spine should be the width of the book including the covers and the length of the book. Clear as mud right?? The width of the spine to include the covers. spinecovercentered

Here is a picture of the paper covering the spine.  I put two hashmarks top and bottom on the center of the paper that is to cover the spine.

spinepaperbck

To make covering the spine even more of a challenge I had to center this boxy looking lattice on the spine. I folded it along each side of the spine using the bone folder to crease the paper. I then checked before I glued it down to be sure it was centered.

spineclipped

At the top and bottom of the spine cut a 45 degree angle and fold the paper on the spine down to cover the cardboard spine.  Spines normally float free and should not be glued but my paper was thin so I decided to glue it down.

foldspineover

Glue the spine to the book and fold over the remaining edges. I didnt need to clamp it with the binders clips because the glue is so sticky it held. If it hadnt I would have held it in place with the clips till it dried.

Cut two pieces of archival paper to cover the insides so all your folded paper doesnt show. These are called the endpapers.  Glue them down with the PVA glue.

Clamp with the binders clips and protect the book with deliwrap.

 Let dry.

Finishedsketchbook

Glue a scrap of watercolor paper painted with pretty colors for your title!

Coat the book with Modge Podge to make it more durable.

Now go forth and draw!!

Thanks for looking!!

Day 217 – Life Modeling in Aiken

Amy

With the lovely Amy.  My best one so far I think….love the way it turned out.  I did the sketch completely from start to end with Caran d’Arches Neocolor II watersoluble wax pastels.

TIP: I sprayed them with a fine misty spray bottle to get the colors to brighten.  It was so  much easier than brushing the colors with a brush that I was finished early….this is a big picture…on a watercolor half sheet.  If you do this why its vertical you get some lovely drips of color.

TIP: I also used an old grumbacher hog bristle brush to life color off the page.  That worked great like across the top of the thigh where I did not have enough curve and the light on the front of the left leg.

TIP: You can also wipe out color at least on Fabriano with a folded paper towel.  Fabriano is terrific for letting you lift color when its wet.  Tough paper!!

Try it you will see how much easier it is…I think this would work with watercolor pencils too.  I hate to think of the number of times I have spent hours coloring a picture with watercolor pencils only to loose some lovely detail when you wet them with a brush.

The texture of the sketching can also just disappear before your eyes when you use a brush…Going to try that technique again…alot of fun. Paper is Fabriano Artistico 140# watercolor paper.

Now will an animal or a person PLEASE hold still long enough for me to sketch them??

Day 213 – WOW I don’t like that number!!

I started my post with some trepidation over the number 13.  I am Irish enough I see a cloud over that number.  I was right.  I had my post all done and accidently closed it…vanished gone…nowhere to be found. SIGH!! That would never happen with blogger.  It saves as you type…oh well we live and we learn right?!!

Time to post some more sketchbookskool homework.  The assignment was to draw some plastic animals in preparation for drawing live animals.  I did it backwards but at least I did it right??  I have lots of animals at my house…but no plastic ones.

I went to Krogers and bought some from their $1 bin.  They stunk. I bought them anyway.  More about the stinky animals from Krogers but suffice to say you can buy them at some Michaels and also at Dollar stores. They dont stink and the Michaels ones have great detail.

I had several pages already painted in my Strathmore 500 Mixed Media sketchbook that were for Dr. Sketchys 2 and 5 minute gesture sketches.  We didnt have any gesture sketches last Wednesday so I decided to draw the animals on those pages.

Tyrannosaurus Rex

Tyrannosaurus Rex

This is my Michaels T-Rex.  I MISSPELLED his name. Seriously. SO I decided to write all over the page. Not happy with the first large drawing I drew him again….also from the front.I looked up T Rex in wikipedia and wrote down facts about him making this a scientific page.

Giraffes

Then I drew the Raffe…hes my favorite…hard not to love them. My toy giraffe is about 8 inches tall!! I drew him from various views like I was going to do with our Dr. Sketchys model.  Rather like the effect.  Then I wrote Giraffe all over the place.  I can’t seem to stop writing on my sketches lately.

Pens used!  Pentel Brush Pen, Lamy Vista Fine and a Stadler.  Also my Noodler Creaper Ahab.  I did add some color to the giraffe.  Burnt sienna and touches of Burnt Umber in the spots.  Shadows were done with Cobalt and Piemonite.

Thanks for looking…lets pray this one posts!!

Day 21o – Life Drawing at USC Aiken

It’s Saturday. That means the faithful are trekking to Aiken to sketch. Most Saturday’s find Ruth, Tom and I meeting at Earthfare to make the forty mile drive to USC Aiken.

Our model today was Elena.

IMG_7807
This is as far as I have gotten. The purple in it is piemonite mixed with cobalt.  I am going to check my plumb lines.  I think the left eye is too high still.  And her hair…please models wear your hair DOWN…that upswept hair may look quaint and cute but oh my what a pain it is to paint with watercolors!!

At least she does have a nice glow to her.  I have to say LOVING that Fabriano Artistico cold press 140#. Dampen the offending paint and it just about wipes off this paper. THANK goodness!!

She’s gone thru quite a few revisions. Still not happy with her.

IMG_7798

My favorite part…that might tell you how much I like this painting!!

IMG_7801

Here she is after working on her at USC AIken this morning.  Not liking her much at all!!

splatter

Splattered most of the background on with a combo of Piemonite and Cobalt…soupy. I should have turned that top paper towel DOWN!! Had to clean up alot of splatters from her face and her right shoulder OOPS!! But the background is my favorite part of this.

Thanks for looking!! Sorry to be so whiny!!